Remove Deep Clear Coat Scratch in 5 Easy Steps

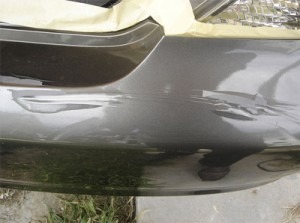
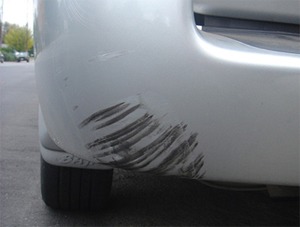
As you can see from the picture above, this black Cadillac CTS had a deep clear coat scratch. Bodyshops would charge you anywhere from $300 -$500 to remove it and you would be without a car for a few days.
In this post, I will show you how to remove this scratch in 5 easy steps. No experience is needed. The steps include sanding a clear coat, applying rubbing compound, polishing compound, and wax.
To save you money, I am listing products under “items you will need” and “optional items”. I don’t want you to feel overwhelmed by a long list of things you need to buy to do the repair. You will only need a few things to get it done right. All the optional items are just great products and tools that can be used not only for this repair but also to maintain the beautiful appearance of your car.
Items You Will Need:
- Wet/dry 2,000 grit sandpaper
- Prep solvent – It removes oils, road grease, dirt, car wax, and other surface contaminants and also improves adhesion to the surface.
- Meguiar’s Ultimate Compound – You can use any rubbing compound you like, just make sure it is clear coat safe. Meguiar’s Ultimate Compound is the best car scratch remover I’ve ever tried. It removes light-to-deep clear coat scratches, swirl marks, stains, and heavy oxidation in just a few minutes. It’s clear coat safe and inexpensive.
Optional Items:
- Microfiber Towel – Avoid using other materials such as bath towels, paper towels, or washcloths, as they might leave scratches on the clear coat.
- Applicator Pads – These pads are used to apply rubbing compound, polish, and wax.
- Meguiar’s Ultimate Polish – Use your favorite polishing compound. I like Meguiar’s Ultimate Polish because it uses diminishing abrasive technology, meaning the tiny abrasives break down gradually as you rub. The paint color will look bolder and brighter with a smooth, sleek shine. It is high quality, inexpensive, long-lasting, and clear coat-safe.
- Meguiar’s Tech Wax – Use your favorite wax. I like Meguiar’s NXT Generation Tech Wax. This product is amazing because not only does it give the deepest and clearest shine you’ve ever seen, but it also acts as a paint sealer giving your car long-lasting protection.
- Dual Action Sander/Polisher – I found a nice beginner polisher on Amazon for a reasonable price that will give you amazing results. There are a lot of professional polishers, but they cost over $200. This Black & Decker polisher got great customer reviews.
Step 1: Wash the Area
First, wash the area being repaired with warm water and auto soap. Follow it with prep solvent to remove wax, old, and dirt.
Step 2: Sanding
In this step, you want to even out the clear coat without sanding through to the paint. Wet sanding works the best. Use wet/dry 2,000-grit sandpaper to sand down the scratch.
Soak sandpaper in cold water for 10 min. Spray the surface with water and start sanding applying some pressure. Keep checking the area for smoothness with your fingers.
Wipe off the water and dust and check the surface. If the scratch is still there, continue sanding. If you are standing next to the edge of the door, apply less pressure because there is barely any paint on the edge.
Tip: Some people use shoe polish over the damaged area to visualize the scratches and to guide them while sanding. The material should be contrasting with the paint color of your car.
Fill the scratches with shoe polish by wiping it over the panel. Sand until the shoe polish disappears. I personally don’t use this method because I can see if the scratch is there or not.

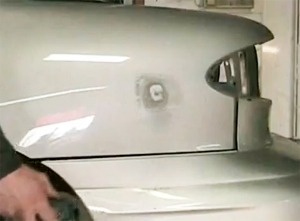
Step 3: Cleaning the Area
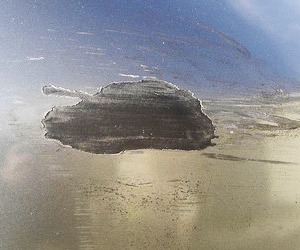
After sanding, clean and dry the surface. Here is how the area will look after you are done. Because of the bright light, it looks like the area is gray and the paint is missing. In reality, it’s just covered with tiny clear coat scratches that are easily removed with some rubbing compound.

Step 4: Rubbing Compound
To remove sand scratches and restore shine, we use rubbing compounds. Apply a few drops onto the clean application pad and rub it on the surface. You can continue rubbing by hand or by using a Dual Action Polisher.
Of course, using a machine will make the application faster and easier, but if you don’t have money, you can do it by hand.

For applying rubbing compound set Dual Action Polisher at 1,800 rpm. Keep moving DA to avoid burning the paint. You might need to do a few rounds for all the scratches to disappear. Wipe off residue with a microfiber towel.

Step 5: Apply Polishing Compound
The polishing compound will give you a showroom shine. Again, you can apply it by hand or use a DA. If you are using DA, set it at 1,000 rpm.

Step 5: Wax
Re-apply wax to seal the repair and you are done.

Final result:
As a final result, you should have a nice shiny surface that looks like nothing ever happened. Because of all the polishing, the repair area might look better than the rest of the car. To fix that, you will need to polish the rest.
The whole project can be done in less than an hour and will save you hundreds of dollars.


hi,
My daughter used rubbing compound to get some scratches off her door. It looks like she rubbed to hard so now there is a cloudy haze instead of the scratch. Should I use the 2000 sand paper on it and then go back over that with the rubbing compound and finish out like you say? Thanks!
I liked it very much. I use grit 1,000, is it about the same as the 1,000 grit? I like to know. Also is a Black ad Decker drill gun adequate with a polishing pad.
I like to add one last comment, do you have self repair videos. Tanks.