
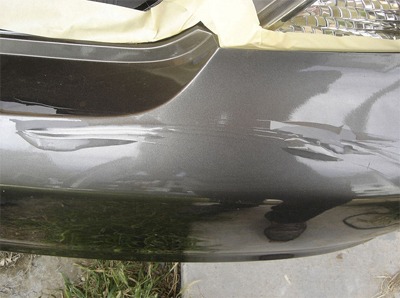
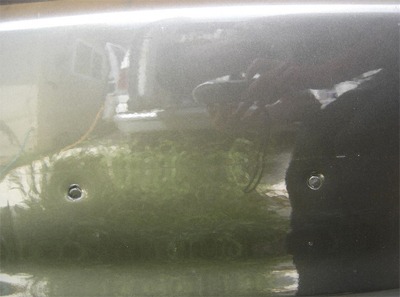
Here is a step-by-step process of repairing bumper holes and peeling paint on a Toyota Camry. It had a few very deep scratches on the front bumper below the right light, two holes from a license plate, and chipped paint on the back bumper.
It would cost around $500 – $1,200 to get it fixed at the body shop. Fortunately, this kind of damage can be repaired at home for a fraction of the cost.
Make sure you have at least two days for this project. Pick a weekend when the weather is nice. The best temperature is 72F with a 50% humidity. Avoid painting in direct sun, windy conditions, and high humidity.
If you are doing it during cold winter, use the heated garage. Since you’ll be doing a lot of spraying, make sure you have good ventilation.
I personally use high-quality products to ensure the best results. I am listing my personal favorites below.
Items you will need:
- Assorted Wet/Dry Sandpaper – This pack includes 5 sheets of assorted sandpaper (1 sheet each of 180, 320, 600, 1000, and 1500) and can be used for sanding primer, clear coats, and automotive paints.
- Spot Putty
- Plastic Spreaders
- Primer (aerosol spray)
- Touch-up Paint (aerosol spray) – Custom paint matching your car
- Clear coat (aerosol spray)
- Auto Masking tape and Old newspapers
- Prep solvent – It removes oils, road grease, dirt, car wax, and other surface contaminants and also improves adhesion to the surface.
- Meguiar’s Ultimate Compound – You can use any rubbing compound you like, just make sure it is clear coat safe. Meguiar’s Ultimate Compound is the best car scratch remover I’ve ever tried. It removes light-to-deep clear coat scratches, swirl marks, stains, and heavy oxidation in just a few minutes. It’s clear coat safe and inexpensive.
Some Optional Items:
- Rust Remover
- Respirator, Gloves, Goggles
- Meguiar’s Ultimate Compound – You can use any rubbing compound you like, just make sure it is clear coat safe. Meguiar’s Ultimate Compound is the best car scratch remover I’ve ever tried. It removes light-to-deep clear coat scratches, swirl marks, stains, and heavy oxidation in just a few minutes. It’s clear coat safe and inexpensive.
- Meguiar’s Tech Wax – Use your favorite wax. I like Meguiar’s NXT Generation Tech Wax. This product is amazing because not only does it give the deepest and clearest shine you’ve ever seen, but it also acts as a paint sealer giving your car long-lasting protection.
- Microfiber Towel – Avoid using other materials such as bath towels, paper towels, or washcloths, as they might leave scratches on the clear coat.
- Dual Action Sander/Polisher – I found a nice beginner polisher on Amazon for a reasonable price that will give you amazing results. There are a lot of professional polishers, but they cost over $200. This Black & Decker polisher got great customer reviews.
- Foam Applicator pad
- Tack cloth
Step 1: Getting the paint
Paint can be ordered at the car dealership or online. I personally, always order paint online from Automotive Touch-Up to save time and money. The paint code for your car should be located on the label inside of your car.
Location varies depending on the make and model. Start by looking in the places like glove box, trunk, under the hood, passenger side door, or inside the engine bay area. Sometimes, it is hard to find.
Next, go online and order all the items. Websites that specialize in touch-up paint have the best prices.
Step 2: Check for rust
If you waited for too long to fix this problem, there might be some rust. Remove the rust by using a rust remover.

Step 3: Personal Safety
Don’t forget about safety. All these spray products like primer, paint, and clear coat, are very toxic. You can protect yourself by wearing a respirator, gloves, and goggles. Read the label before applying each product.
Step 4: Prepare the surface
Wash the damaged area with dish soap and water. Dish soap works great removing wax, oils, and dirt. Follow it with prep solvent to remove tough contaminates. After the area is clean, dry completely.
Step 5: Sanding
Start by sanding the damaged area with wet/dry 320-grit sandpaper and follow with 600-grit. I like wet sanding better because it cuts faster and doesn’t clog. Wrap sandpaper around a soft sponge to avoid fingerprints and soak it in water for 10 min.
Adding a few drops of dish soap will make it more slippery. Sand the area using a lot of water. Keep checking with your fingers for smoothness.


Step 6: Cleaning and Masking
Clean the dust and mask off the area around the damage with auto tape and old newspapers.
Step 7: Putty
To fix those two holes in the back bumper, you can use body filler or spot putty. In this case, putty will work the best. It takes 15-20 minutes for putty to dry, so you need to work fast. Read the instructions first.
Use a plastic spreader to apply putty. Give it enough time to dry before sanding. Sand it with wet/dry 320-grit and follow it with 600-grit. Don’t forget to wash off sandpaper after 3-4 sweeps to avoid clogging. Clean the area and dry it completely.
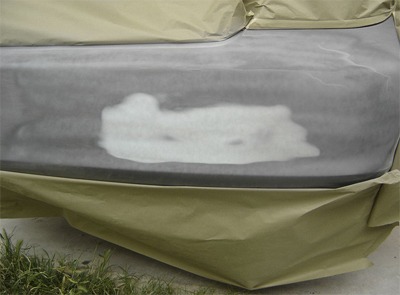
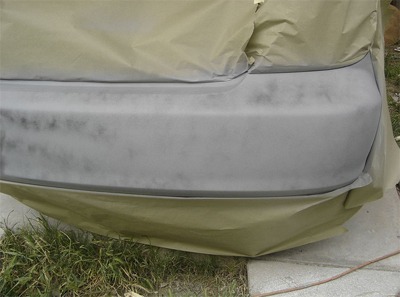
Step 8: Primer
Read the instructions on the primer. Shake well. Hold the can 10-12 inches away from the surface and spray with even strokes. Give each coat enough drying time before applying the next one. Drying time varies depending on the product.
Step 9: Sanding Primer
Before applying the paint, you need to make sure the surface is as smooth as possible. Remove the masking paper. Sand the primer with wet/dry 600 grit sandpaper and follow it with 1,000 grit. As in the steps above, wrap sandpaper around a sponge and use a lot of water with few drops of dish soap.
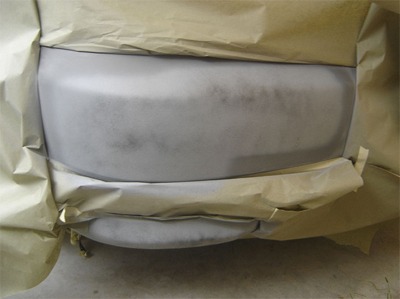
Step 10: Cleaning and Masking
After you are done sanding, clean the area and dry completely. Now you need to mask it off again. This time you will leave more surface around the damage for better paint blending. To get an even finish, mask off the whole panel where damage is located.
Step 11: Applying Paint
To blend the new touch-up paint with the old one, you need to do paint feathering. Feathering is when you apply paint in such a manner that no definite edges are visible. To make the damaged panel blend in with the surrounding auto body panels start by spraying the damaged area first.
With each coat of paint spray a little farther away from the damage. The goal is to lightly spray with feather coats of paint adjacent area to blend in the repair area.
This technique also can help create a smooth transition if the new paint is not perfectly matching the old one.


Step 12: Clear coat
Start by reading instructions on the clear coat can. Shake well. Spray in even strokes spraying a little outside of the repair area to blend in the repair area. Give each coat enough time to dry. Three coats should be enough.
Step 13: Rubbing Compound
We use rubbing compound to smooth out the surface and bring out the shine. Rubbing compound also removes small scratches. Think of it as a very fine sandpaper. Wait for one day before applying rubbing compound.
Apply small amount to the foam applicator pad and rub the surface till it is dry. Remove residue with clean microfiber cloth.
Step 14: Polishing Compound
The polishing compound application will give your car a showroom shine. It is best if used with buffing machine, but you can do it by hand. If you are planning on getting a buffing machine, I would recommend Meguiar’s Dual Action Polisher. I use it to apply rubbing compound, polisher and wax.
Step 15: Wax
Even after applying polishing compound, you still need to apply wax. Wax will protect the paint from different weather conditions. Wait 30 days before waxing your car.
Very good and thorough tutorial. I’m going to repair my daughter’s scrapes!
Thanks!
Hi Brad. Thanks for stopping by. Let me know how it goes.
Thanks for this great tutorial, working on mine this weekend! Thank you
someone scratched my 2008 toytoa hybryd rear bumper . i have a 2″ scratch that showes black . my paint is meltillac beige do i need to spray or use a paint stick. thanks
im thinking about repairing my whole front bumper.it has alot of rock chips as well as scratches. was wondering how much primer and paint i’ll need to get the whole bumper done.thanks!
How much do you charge for normal peel of in the bumpers